
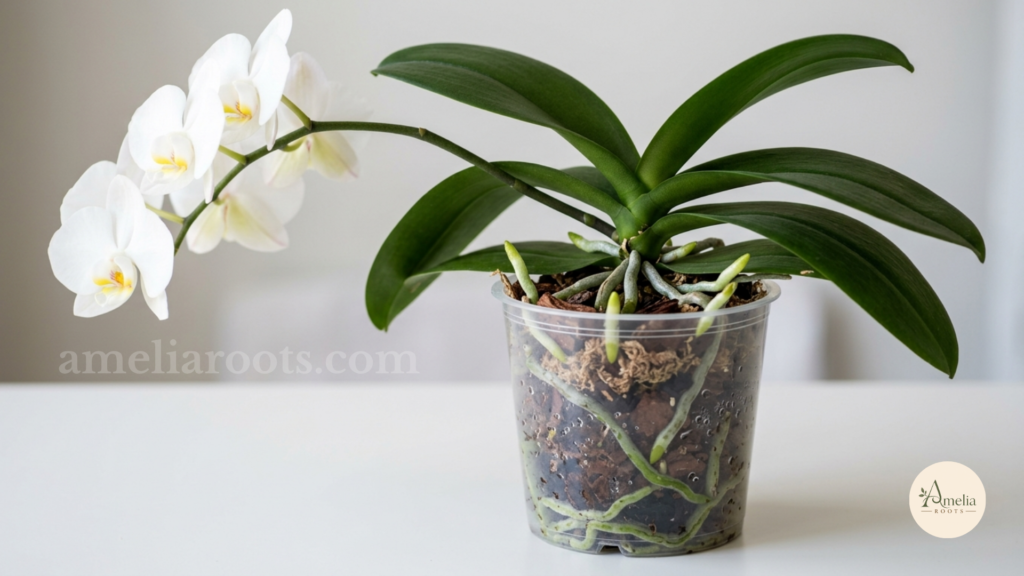
You’re standing in front of your orchid, and something’s obviously wrong.
The bark that was crisp and chunky last year is now mush. Roots are escaping the drainage holes. But repotting feels terrifying—you’ve heard horror stories about orchids going into shock, wilting for months, never flowering again.
So you wait.
Then one morning you notice the pot smells faintly rotten, and now you’re facing a real crisis. Sound familiar?
Here’s the truth: Repotting isn’t what kills orchids. Not repotting when they desperately need it is. And the biggest secret most care guides won’t tell you? Orchids are far more resilient than their delicate appearance suggests.
The real key isn’t being gentle—it’s being smart about when you repot, how you prepare, and what happens in those critical 2 weeks after.
Over the past few years, I’ve repotted dozens of orchids. I’ve made every mistake in the book: over-aggressive root trimming, packing media too tight, repotting in winter, watering too soon. But I’ve also figured out exactly what works.
In this guide, you’ll learn:
- When to repot (the signals that matter—and when to absolutely wait)
- How to prepare without damaging a thing
- The exact 8-step technique that keeps roots safe
- What to expect post-repot so you don’t panic at normal stress
- How to fix problems if they happen
- A week-by-week recovery checklist you can actually use
Let’s start with the thing that matters most.
When to Repot an Orchid: Timing Changes Everything
Here’s what I learned the hard way: most orchid damage doesn’t happen during repotting. It happens because you repotted at the wrong time.
I remember my first Phalaenopsis. Beautiful blooms, tired-looking bark. I thought: why not repot now and get ahead of it?
Within days, every bud dropped.
The plant spent three months just sitting there, leaves drooping, redirected all its energy to surviving the stress instead of flowering. I’d made the rookie mistake of repotting during bloom.
Then I tried a second orchid—same species, similar conditions—but this time in early spring when new roots were already pushing out pale and tender from the base.
That one bounced back in two weeks. Flowers came the next year like nothing had happened.
The difference wasn’t the technique. It was the timing.
Look for This: Active Root Growth
There’s a window when repotting barely stresses orchids at all.
Look at the base where roots emerge. Do you see pale green or white nubs pushing out—still tender, not yet established?
That’s your signal.
That’s when the plant is primed for growth and can handle disruption almost instantly. New roots mean the plant is already in growth mode, ready to expand. Repot during that window, and recovery happens fast.
The Red Flags: When NOT to Repot
During bloom. Buds are energy-intensive. When you repot, the plant says: “Actually, survival first—flowers later.” Buds drop. Wait until flowers fall naturally, then wait 1-2 weeks more.
In winter or dormancy. If growth has slowed to nearly nothing, repotting adds stress the plant can’t recover from quickly. You won’t see problems until spring—yellowing leaves, wilting, stunted growth—because deterioration happened slowly over months.
When the plant is already stressed. If you’re dealing with root rot, pests, or severe dehydration, the instinct is to repot immediately. Usually, that’s wrong. Treat the problem first, let the plant recover 2-3 weeks, then repot.
Your Repotting Checklist
Check these before you start:
- ✓ New root nubs are emerging (pale, tender, reaching outward)
- ✓ Active growth is visible (new leaf unfurling or existing roots pushing out)
- ✓ Flowers have dropped (not about-to-drop—actually gone)
- ✓ The media is genuinely breaking down (chunky bark has turned to dust or packed mud)
- ✓ Water drains too fast (sign old media is compacted)
Hit 3 of these 5? You’re ready.
One more thing: Most orchids don’t need repotting yearly. I have Phalaenopsis specimens that went 3-4 years without repotting, thriving the whole time. If your orchid is growing, blooming, and the bark is still intact, skip it. Over-repotting stresses plants for zero gain.
Preparation: The Step That Actually Prevents Damage
This is where quality repotting happens—before you even touch the orchid.
Walk into any garden center and you’ll see pre-packaged orchid mixes. I fell for that early on. Bought three bags that looked perfect—lots of bark chunks, seemed reasonable.
Results? Dead inner roots within weeks.
The fine particles I couldn’t see settled to the bottom, compacted, and suffocated roots underneath. I learned the expensive way that the media you use matters more than the technique you use.
Your Tools (Sterilized)
The essentials:
- Sterilized scissors or pruners (I use rubbing alcohol—faster than boiling)
- A chopstick or wooden dowel (for gently firming media)
- Spray bottle with room-temperature water
- Clean towel or work surface
- The new pot (clean, multiple drainage holes)
- Optional: gloves (they give better grip)
For sterilization: Rubbing alcohol or 10% bleach solution (1 part bleach to 10 parts water).
Why sterilize? Dead roots harbor fungal spores. You’re introducing a vulnerable plant into fresh conditions. Contaminated tools spread problems that take months to show up.
My process: Wipe scissors with rubbing alcohol between cuts. For pots, scrub, soak in diluted bleach 10 minutes, rinse until no bleach smell remains.
It’s 5 minutes. It’s the difference between success and crisis.
The Media Decision: This Changes Everything
Commercial orchid mixes are inconsistent. I’ve tested batches. Some are mostly coarse bark. Others hide peat, coir, or fine particles that compact after a few waterings.
Start here: Coarse orchid bark (fir bark, 3/4″ chunks). That’s your base. Non-negotiable.
My personal formula: 70% coarse bark + 15% horticultural charcoal + 15% sphagnum moss.
Adjust for your environment:
- Drier climates? Use 80% bark, 10% moss.
- Very humid? Moss can go to 20-25%.
Charcoal aerates media and neutralizes salt buildup from tap water. It’s genuinely helpful.
The critical step most guides miss: Pre-soak your bark the night before repotting.
Dry bark is hydrophobic—water beads off. Even after you repot and water, moisture struggles to reach the media. Your plant looks over- and under-watered simultaneously.
Soak for 2-4 hours (overnight is easiest), drain it fully, and it becomes absorbent. Ready to wick moisture to roots exactly when needed.
Reading Root Health: The Moment That Matters
When you open that root system, you need to know what you’re looking at.
My biggest early mistake: confusing healthy older roots with dead ones just because they weren’t bright white. I trimmed too much, removing roots the plant relied on. Plant recovered, but slowly.
Then I got conservative. Realized texture matters infinitely more than color.
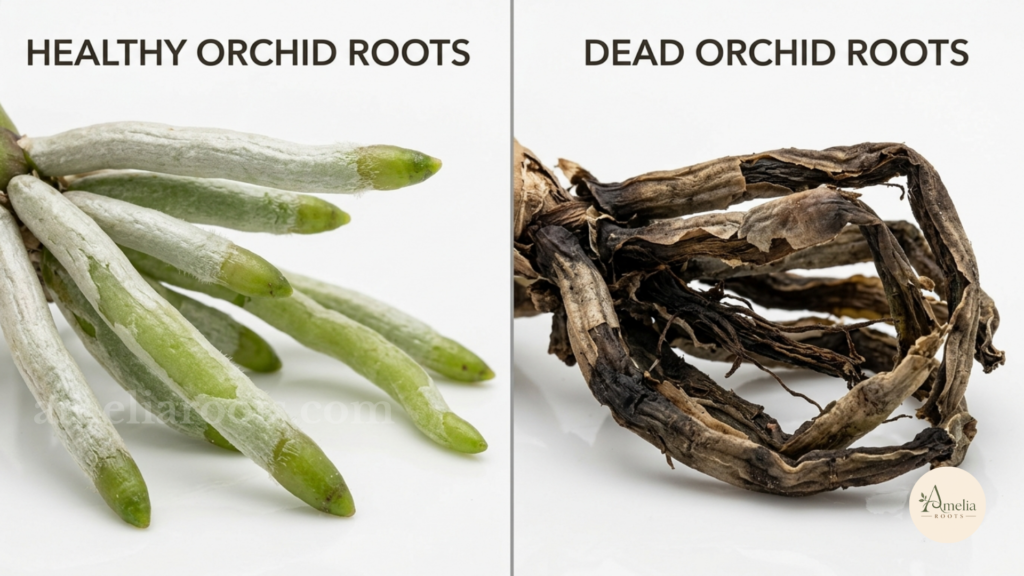
Healthy Roots (Keep Them)
Pale green or white. New roots emerging. Tender but firm.
Tan, light brown, even slightly yellow. Older, established roots. Perfectly healthy if they’re firm.
Texture test: Press gently. Should resist—feel slightly waxy with subtle give. Not squishy. Not papery.
No smell, no spots, no fuzz. If it smells earthy-foul (not just like old media), something’s rotting.
These stay in the pot.
Dead or Rotted Roots (Trim These)
Squishy or mushy. Tissue has collapsed. Structure is gone.
Dark brown or black, hollow inside. The root is dead.
Papery or thread-like. Outer layers have dried away; it’s hollow skeleton.
White fuzz, dark discoloration, or slime. Fungal or bacterial infection. Trim and sterilize scissors after.
How to trim: Use sterilized scissors. Cut back to living tissue—where it transitions from dead (dark/mushy) to alive (pale/firm). Make clean cuts, not rips.
Here’s the insight: a single root might have multiple conditions along its length. Half healthy, middle section rotten, base fine. Inspect carefully and trim selectively.
Quick tip: When in doubt, don’t cut. Orchids are resilient. Erring conservative beats over-trimming.
The 8-Step Technique: How to Repot Without Damage
Take your time here. Rushing is where mistakes live.
Step 1: Remove the Orchid (With Patience)
Soak the entire pot in room-temperature water for 15 minutes.
Moisture softens old bark and makes roots pliable. Tip the pot on its side. Gently slide the plant out.
If it resists, don’t force it—soak longer. If still stuck, use a credit card along the interior edge or gently tap the pot with a hammer on sides where there are no roots.
Support the base and roots, not the stem. Pulling by the stem risks breaking leaves.
Checkpoint: Plant slides out with minimal resistance. Nothing damaged yet.
Step 2: Survey Before You Dismantle
Don’t immediately rip apart the root ball.
Spray old bark gently or run water over it to rinse surface dust. As bark loosens, peel it away from outer roots. Look for hollow or mushy sections and trim those first, before loosening more media.
This is surveillance, not destruction.
Checkpoint: You can see the main root structure. You know which roots need trimming.
Step 3: Clean Methodically
Use gentle water spray or submersion to soften remaining bark.
Use your fingers or tweezers to peel old bark away, section by section. Some old bark might remain adhered to roots—if it’s firm and not rotting, leave it. It will decompose naturally over months.
Work patiently. Every root you preserve is a root the plant can feed from sooner.
Checkpoint: Most root system is visible. Old bark that’s still solid is left in place.
Step 4: Trim Dead Tissue Only
Using sterilized scissors, identify squishy, hollow, or darkly discolored roots.
Cut back to living tissue. Remove only the damaged portion. When in doubt, don’t cut—conservative trimming beats aggressive pruning.
The plant will be healthier with some old roots than with too many cut edges healing simultaneously.
Checkpoint: Obviously dead tissue is removed. Firm, tan roots remain intact.
Step 5: Select and Prepare the Pot
Size: Just large enough for the root mass, with 1-2 inches space around it.
This is critical. Orchids don’t like loose potting. Too much empty space = water pools = roots rot.
Type: Clear plastic with 5+ drainage holes is ideal (you can monitor roots later). Clay pots drain fast but need more frequent watering. Ceramic is beautiful but poor for drainage.
No exceptions: The pot must drain fully.
Checkpoint: You have a clean pot that’s right-sized for the roots you actually have.
Step 6: Seat the Plant (The Architecture Moment)
Add a 1-inch layer of pre-soaked bark to the pot bottom.
Hold the orchid at the height where its base sits just above the media rim. For Phalaenopsis, roots should emerge at or just above the surface. For Cattleyas, pseudobulbs sit upright.
While holding the plant, use your chopstick to gently firm bark around roots. Press gently—you’re creating stability, not compacting.
Work in layers: 1 inch bark, firm gently, another inch, firm, repeat. Stop when full.
Media should feel loose with visible air spaces between roots and bark. This isn’t a houseplant repotting. Orchid roots need air as much as moisture.
This is the most critical step. Too-packed media kills orchids by suffocation.
Checkpoint: Plant is stable. Media is loose with visible air gaps. Crown is above the rim.
Step 7: Water Thoroughly (Immediately)
Right after repotting, water thoroughly.
Use room-temperature or tepid water—avoid ice-cold. Water until excess drains from the bottom. This settles media, removes air pockets, signals to roots they’re in good conditions.
Allow all excess to drain fully. Don’t let the pot sit in water.
Checkpoint: Media is moist. Water has drained completely.
Step 8: Support (If Needed)
If the plant is wobbly or top-heavy, use a soft stake or clip to stabilize the stem.
Don’t tie too tightly—allow slight movement. Remove support after 2-3 weeks when roots establish.
Checkpoint: Plant is upright and stable.
The 2-Week Recovery Protocol: What to Expect
Your orchid will look sad. Leaves may droop. Growth might pause.
This isn’t failure—it’s shock. It’s completely normal. Understanding that is half the battle.
Week 1: The Adjustment Phase
What you’ll see:
- Leaves drooping or appearing limp
- Reduced vigor (plant is in recovery, not growth)
- No new growth yet (energy going to root re-establishment)
What to do:
- Don’t water again. The initial watering settled media and hydrated roots. That’s enough.
- Place in bright, indirect light. No harsh direct sun.
- Avoid temperature swings and drafts.
- Group plants together for humidity (or mist the air around it, not leaves directly).
- Don’t fertilize yet. Plant isn’t actively growing.
What NOT to do:
- Don’t repot again in panic (“rescue repotting”).
- Don’t move it to brighter light.
- Don’t fertilize.
- Don’t water.
I remember my first repotted orchid drooping on day 2. I was convinced I’d killed it. Ready to repot again.
Instead, I waited.
By day 5, a tiny new root nub appeared at the base. By day 7, a new leaf was unfurling. It had been fine the whole time—just stressed.
Week 2: Stabilization
What you’ll see:
- Leaves should firm up noticeably
- New roots might emerge (pale shoots at the base)
- Overall droop diminishes
What to do:
- Still no fertilizer.
- Water only if media feels dry (stick finger in to first knuckle; if dry, water; if moist, wait).
- Continue bright, indirect light.
- If new growth appears—new leaf, new root—celebrate quietly. That’s your signal of success.
Watering strategy post-repot: Most orchids: once every 5-7 days. Some people soak 15-30 minutes; others pour from the top. Both work if you drain thoroughly.
The rule: Drain completely every time. Excess water in fresh media = rot starting.
Use room-temperature water. Not ice-cold (tropical orchids struggle with temperature shock).
If Something Goes Wrong: Quick Diagnosis
Wilting Beyond Week 3
Most likely: Overwatering. Roots suffocating in wet media.
Stop watering. Let media dry out fully. Next cycle, use coarser media or firm less aggressively. If wilting continues past week 4, check roots—they might be rotting.
Yellowing or Dropping Leaves
Normal stress: 1-2 leaves dropping is expected.
If more than 2-3 leaves drop in week 1: Check media for foul smell (= rot) and roots for mushiness. If either present, emergency repot immediately.
Spreading yellowing after week 4: Might indicate nitrogen deficiency if it’s been 4+ weeks without fertilizer. Start half-strength fertilizer every 2 weeks.
Bud Blast (Flowers Drop Post-Repot)
You repotted during bloom. Buds dropped. That’s stress response.
It’s frustrating but not fatal. Plant will flower again after recovery (3-6 months). Next time, wait until bloom ends.
The Mistakes I Made (So You Don’t)
Mistake #1: Using Commercial Mix Without Reading Labels
Pre-packaged mixes often contain peat, coir, or fine particles. You water, they compact, inner roots suffocate.
Fix: Read labels. Look for coarse bark as primary ingredient. If you see peat or potting soil, skip it.
Mistake #2: Not Soaking Bark First
Dry bark is hydrophobic. Water beads off. Your orchid looks over- and under-watered simultaneously.
Fix: Soak bark the night before. It’s a 2-minute task that changes everything.
Mistake #3: Overpotting (Too-Large Pot)
Excess media = excess water retention = root rot starting.
Fix: Use a pot just large enough. A snug pot is healthier than roomy.
Mistake #4: Over-Trimming Healthy Roots
I used to clean roots until pristine white. I was actually removing healthy older roots the plant relied on.
Rule: Only trim truly dead roots. Conservative trimming beats aggressive pruning.
Mistake #5: Repotting During Bloom or Dormancy
It doesn’t work. Plant can’t recover while flowering or dormant.
Fix: Time repotting to active growth (spring, early summer). Avoid winter, bloom, dormancy.
Mistake #6: Watering Too Soon or Too Much
Roots post-repot are sensitive. Excess water drowns them before re-establishment.
Fix: Water thoroughly once (right after repotting), then wait 2+ weeks before next soak. Let media dry between waterings.
After Week 2: Building Long-Term Health
Fertilizing (Start Week 3-4)
Once you see new growth, start gentle fertilizing.
Every 2 weeks at half-strength. Orchids are light feeders; full-strength can burn tender new roots.
Use balanced orchid fertilizer (20-20-20) or flowering formulas (10-30-20) depending on your phase.
Watering Schedule (Ongoing)
Most orchids: once every 5-7 days. Adjust based on how quickly media dries.
The finger test: Stick a finger into the pot to first knuckle. Dry = water. Moist = wait.
Method: Soak 15-30 minutes or pour from top. Drain thoroughly every time. Room-temperature water.
Environment
Light: Bright, indirect. No harsh direct sun.
Humidity: 40-60% is ideal. Group plants or use humidifier if air is dry.
Temperature: 65-75°F day; 60-65°F night. Avoid cold drafts below 55°F.
Air movement: Gentle circulation prevents fungal issues. Small fan on low, not aimed at plants.
When to Repot Again
Don’t repot for 1-2 years. Some go 3-4 years.
Repot again only if:
- Media fully breaks down (turns to mud).
- Roots are severely crowded, escaping holes.
- Root rot develops (emergency).
Otherwise, leave it stable.
Recovery Checklist You Can Bookmark
Days 1-2 (Immediately Post-Repot)
- ✓ Repot complete, watered thoroughly
- ✓ Plant in bright, indirect light
- ✓ No additional watering
Week 1
- ✓ Plant may droop (normal stress)
- ✓ No watering
- ✓ No fertilizer
- ✓ High humidity if possible
- ✓ Stable temperature, no drafts
Week 2
- ✓ Plant should be firming up
- ✓ Check media dryness; water only if dry
- ✓ Watch for new growth nubs (good sign)
- ✓ Still no fertilizer
Week 3+
- ✓ Plant should look mostly recovered
- ✓ Resume normal watering (5-7 day cycle)
- ✓ Start half-strength fertilizer
- ✓ Watch for new leaf/root growth
Your Real Problem: And The Solution
Here’s what I realized: you don’t just need how to repot instructions.
You need confidence that you won’t kill your plant.
All the information in this guide—timing signals, technique, recovery protocol—it helps. But what you’re really looking for is a system you can actually execute without anxiety.
That’s exactly why I created something for this.
I built a practical recovery timeline and pre-repotting checklist specifically for indoor growers. The week-by-week breakdown tells you exactly what to expect so you don’t panic at normal stress.
The root health reference guide with photos means you’re not guessing whether a root is salvageable. The materials checklist means you’re not scrambling mid-repot.
It’s based on the exact scenarios that cause anxiety—stuck roots, wilting post-repot, unclear root health, overwatering confusion.
The Orchid Repotting Confidence Pack removes the guesswork.
You follow the checklist, you know what to expect each week, and when your orchid droops on day 3, you know it’s normal recovery, not failure.
This is useful if you’re about to repot or just thinking about it.
It’s the difference between following generic steps and actually understanding why each step matters and what comes next.
Get the free checklist + timeline + root health guide
A 1-page PDF you can print, bookmark, or keep on your phone while you repot.
The Final Truth
Repotting an orchid isn’t risky. Not repotting when it needs it is the real risk.
You now know when to repot (active growth, not bloom or dormancy). You know how to prepare (soaked bark, sterilized tools, right pot). You know the technique (gentle seating, layered media, minimal compaction). You know the recovery (week-by-week expectations, minimal intervention, patience).
Most importantly: temporary wilting post-repot isn’t failure. It’s normal recovery. And it passes.
Your orchid is tougher than it looks.
You’ve got this.
FAQ
Can I repot while blooming?
Not if you want flowers. Wait until blooms drop, then wait 1-2 more weeks.
What if I damaged a root?
Minor damage is normal. Orchids recover well. Major damage (50%+ root loss) needs careful aftercare, but most survive.
How often should I repot?
Every 1-3 years. Not yearly. Most thrive best with minimal disturbance.
Moss or bark?
Coarse bark is more forgiving. Moss retains more water. For beginners, bark. For intermediate, a blend (70% bark, 20-30% moss).
How long until flowers again?
3-6 months if repotted during active growth. 6-12 months if during dormancy.
My orchid wilted immediately after repotting. Is it dead?
Probably not. Common stress. Should recover in 1-3 weeks if you don’t overwater. Beyond 3 weeks = check for root rot.
Your next step: Gather your materials, check for active root growth, and schedule your repotting.
Print the checklist. Go slowly. Trust the process.
Your orchid is ready.

Content writer and SEO specialist with 3+ years of experience in research-driven digital content. At Amelia Roots, he turns carefully researched indoor gardening information into clear, practical guidance for houseplant owners and home gardeners. His work combines content research, search intent, and reader-focused writing with the site's editorial and subject-matter review process.