
Your Pothos is turning yellow. Everyone says these plants are impossible to kill, so you assume you’re doing something drastically wrong. You’re not.
The real problem: most care guides treat Pothos like a generic houseplant. They’re not. These evolved as climbers on rainforest trees, clinging to chunky bark in filtered light. That fundamentally changes how they need to be cared for. Get light, water, and soil right, and yellowing stops, growth explodes, and the “impossible to kill” reputation starts making sense.
The Light Problem Everyone Misses
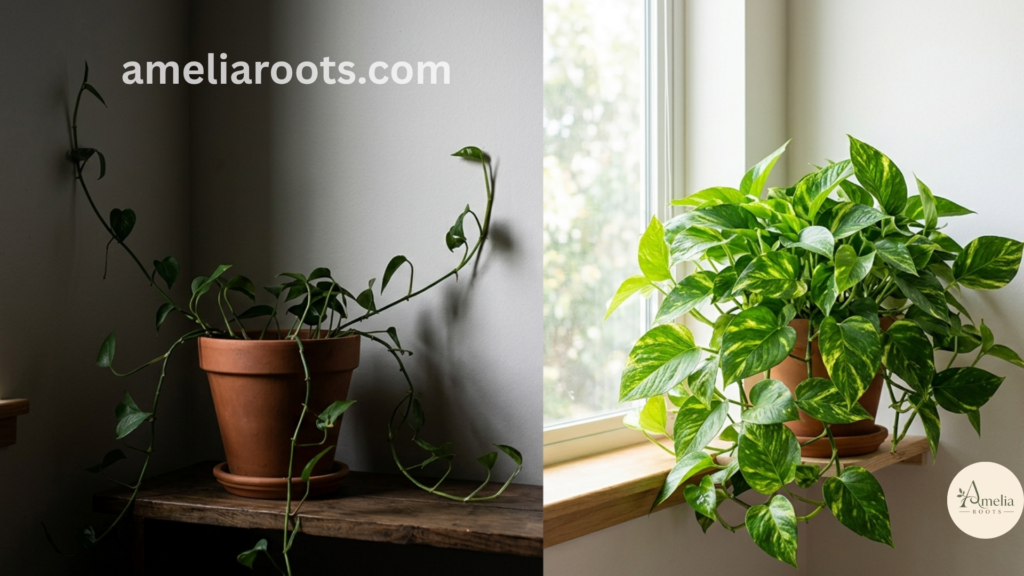
“Pothos thrives in low light” is technically true and completely misleading.
Yes, your Pothos will survive under a desk lamp. But it won’t flourish. Leaves stay small. Growth slows. Variegated varieties lose their color because the plant stops investing energy in beautiful foliage when it’s struggling to capture enough light to survive.
So here’s what’s actually happening: your Pothos survives in low light, but survival isn’t the same as growth.
Your plant survives at 50-100 foot-candles. It thrives at 200 and above. Most indoor plants need 200+ foot-candles for optimal growth, and Pothos is no exception. The difference looks subtle at first, just slightly slower growth. Over months, you realize your Pothos looks half the size of ones you see online. They’re getting more light.
Where to actually place it:
East or west-facing windows hit the sweet spot for most US homes. Morning sun won’t scorch leaves. West-facing afternoon light is more intense but manageable with a sheer curtain if needed.
North-facing? Supplement with a basic grow light ($20-30), running 4-6 hours daily. The improvement is noticeable within 4-6 weeks.
South-facing in the Southwest requires monitoring because direct harsh sun actually damages Pothos leaves, turning them crispy and brown. Filter with a curtain or move back a few feet.
Variegated varieties like Golden Pothos and Marble Queen need brighter light specifically. Low light causes them to revert to solid green. Not because the plant is changing, but because solid green leaves capture light more efficiently. Increase brightness, and the variegation returns, sometimes dramatically.
Watering: Stop Using a Schedule
Fixed watering schedules fail because no two plants have identical conditions.
Watering frequency depends on light, humidity, pot size, soil composition, air circulation, pot material, and season. That’s why a fixed schedule fails. What works Tuesday in spring might cause root rot in summer. What works for one Pothos in a ceramic pot fails completely for an identical plant in terracotta.
The method that actually works:
Stick your finger 1-2 inches deep into the soil. If it feels dry, water thoroughly until water drains from the bottom. If it feels moist, wait 3-4 days and check again.
That’s the entire system. It’s less satisfying than having a calendar, but it works because it’s based on your actual plant’s conditions, not generic timing.
Most beginner problems come from one of two extremes: watering on a schedule (root rot) or underwatering out of fear (edema—water-logged cell damage that shows as blistering on leaves).
What “thoroughly water” means:
Water until you see drainage from the bottom hole. Not “until soil looks wet” but until actual water comes out. This ensures the entire soil column hydrates and air pockets flush out.
Drain for 1-2 minutes, then empty the saucer. Standing water is a fast track to root problems.
Seasonal patterns (not rules):
Spring and summer bring higher watering frequency as growth accelerates, typically 1-2 times weekly depending on your light and humidity.
Fall means frequency decreases as growth slows noticeably.
Winter involves minimal growth, so watering drops dramatically. Often 10-14 days between waterings depending on your heating.
But check soil before assuming. Winter heating makes homes artificially dry, which paradoxically means soil dries faster in cold months. If you have hard water, flush your soil occasionally with distilled water in winter to prevent mineral buildup.
Soil That Actually Works
Standard potting soil holds too much moisture. Pothos evolved on trees with chunky bark substrate, not dense soil. The mismatch causes root rot constantly.
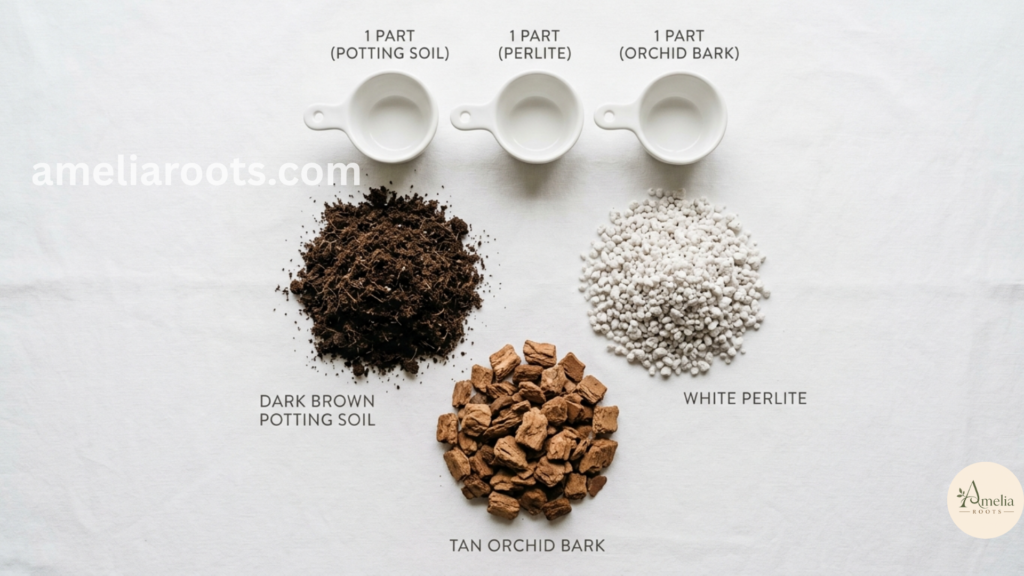
The fix:
Mix equal parts potting soil, perlite, and orchid bark (1:1:1). This creates the chunky, fast-draining structure Pothos actually needs.
Why this ratio works: potting soil is the base. Perlite creates air pockets. Orchid bark adds long-term aeration that stays in place, unlike perlite which floats to the surface over time.
Budget option: 60 percent potting soil mixed with 40 percent perlite. Not as chunky, but dramatically better than standard soil alone.
Pot size matters more than you’d think:
Only go 1-2 inches larger when repotting. A generous pot size creates pockets of wet soil the roots never reach, perfect conditions for rot. Pothos actually prefers being slightly rootbound. A pot that looks a bit snug is ideal.
Drainage holes are non-negotiable. No holes equals guaranteed root rot.
When to repot:
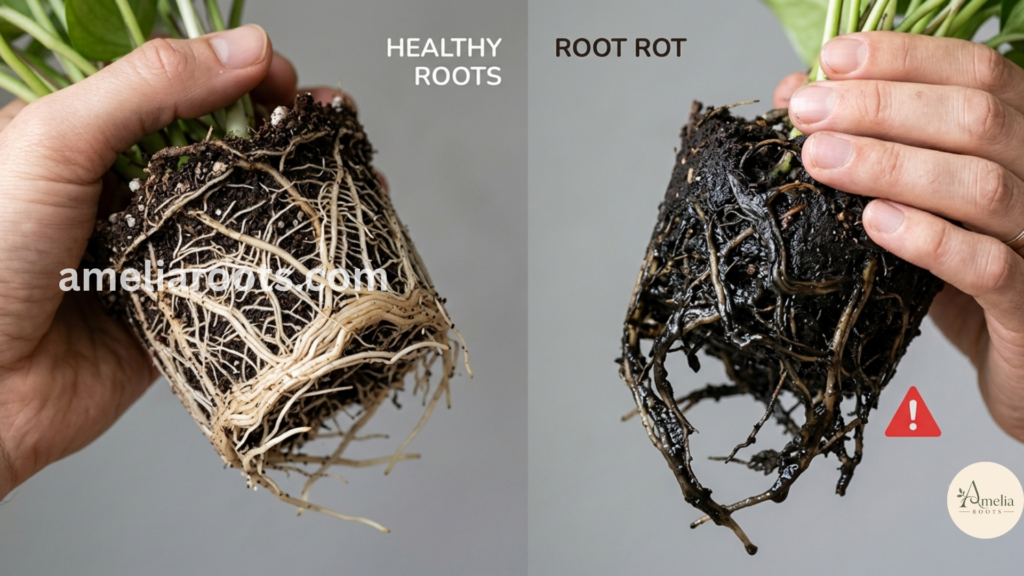
Every 12-18 months, when roots emerge from drainage holes. Inspect roots before repotting. Healthy roots are white or light tan and firm. A few whitish root tips poking out of drainage holes is actually a good sign—it means your plant is ready. Trim any black or mushy roots with clean scissors.
Yellow Leaves: Diagnosis Matters
Yellow leaves trigger panic because they can mean multiple things. The fix depends entirely on which one you’re dealing with.
Pattern 1: Soft yellowing plus mushy stems plus smell
This is root rot. Remove the plant immediately and inspect roots. Cut away any black, mushy sections back to healthy tissue. Repot into fresh, chunky soil. Resume watering only when the top inch is dry, not the top 2 inches.
Root rot is serious but fixable if caught early. Caught late, recovery is uncertain.
Pattern 2: Yellow leaves with brown or black spots, sometimes with a halo
This is usually fungal leaf spot or fertilizer burn. Fungal issues happen when moisture sits on leaves, which is why most guides recommend misting—but it actually makes things worse. Remove affected leaves, improve airflow, and stop misting.
Fertilizer burn (salt accumulation in soil) comes from overfeeding. Flush soil with distilled water, let it drain completely, and repeat. Then don’t fertilize again for a month—let the plant recover.
Pattern 3: Gradual yellowing, no spots, no smell
Nutrient deficiency or low light. Check light first. If light is adequate, start fertilizing monthly during the growing season. Deficiencies resolve within 4-6 weeks.
Pattern 4: Black specks on leaves
Pest droppings. Your plant has thrips, mealybugs, or spider mites.
Pests: They’re Solvable, Just Slow
Pest infestations feel catastrophic. They’re actually straightforward, just time-consuming.
Thrips (tiny, fast, stippled leaves):
Week 1-2: Shower the plant under a sink, isolate it completely, and spray with neem oil every 3-4 days, covering both sides of every leaf.
Week 2 onward: Add systemic granules (Bonide) to the soil and continue neem sprays weekly for 4-6 weeks total. This timeline is normal because you’re fighting multiple thrip life stages simultaneously, and missing even one spray can restart the cycle.
Mealybugs (white cottony clusters):
Immediate: Isolate. Disinfect the pot. Repot into fresh soil.
Treatment: Dab each bug with a Q-tip dipped in 70 percent isopropyl alcohol daily for the first week, then every 2-3 days. Alternatively, spray with equal parts alcohol plus water plus one drop of dish soap every 3 days.
Add systemic granules to prevent recurrence.
Timeline: 2-3 weeks visible results. Monitor 4 and above weeks after last sighting.
Spider mites (fine webbing):
Shower to dislodge. Spray with neem oil every 3-4 days. Increase humidity by misting, which mites actually hate. 2-3 weeks for resolution.
Critical rule: Isolate infested plants immediately. Pests spread to neighboring plants within days. One infected Pothos can infect your entire collection.
Propagation: Why Most Attempts Fail
Pothos propagation looks simple because it mostly is. Most failures come from one mistake.
The main problem:
Submerged leaves rot, and rot spreads to the cutting. Dead cutting.
Correct method:
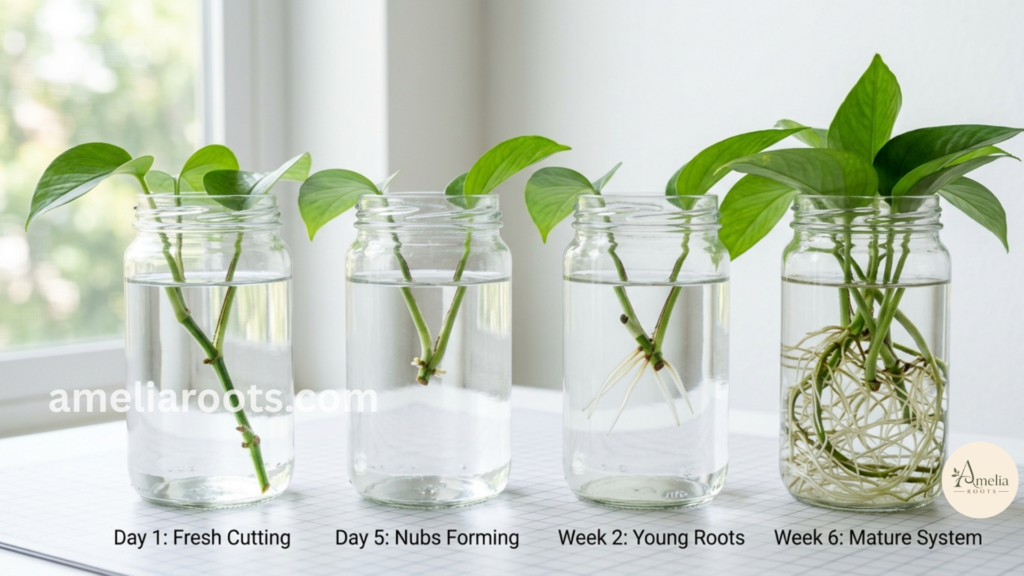
Take 4-6 inch cuttings with 2-3 leaf nodes. Remove the bottom 1-2 leaves—these should NOT touch water. The lowest node should sit just below the water line.
Use fresh water. Change it every 7-10 days. Provide bright indirect light because low light equals slow rooting.
Timeline: Small roots in 1-3 weeks. Robust roots ready for soil in 4-6 weeks.
Rooting hormone helps slightly but isn’t essential. Water alone works fine if you maintain consistency.
Diagnose Your Pothos Fast
Here’s what I’ve noticed: people know their plant has a problem, but they’re not always sure what it is. Yellow leaves could be root rot, low light, or nutrient deficiency. Drooping could be underwatering or root rot. The diagnosis changes everything.
That’s exactly what the Pothos Problem Diagnostic Guide solves.
This is a visual flowchart that walks you through every common problem—yellow leaves, drooping stems, brown spots, pale growth, pest signs—and tells you exactly what’s happening and what to do about it.
Instead of guessing or reading through paragraphs, you answer 2-3 questions (Does it smell? Are the stems mushy? Is the soil wet?) and get the specific fix in seconds.
Get the free Pothos Problem Diagnostic Guide
Enter your email below. We’ll send you the printable flowchart plus a quick reference card showing what healthy roots and pest damage actually look like.
Varieties: Pick the Right One
Golden Pothos is fast, forgiving, and maintains variegation even in moderate light. Best for beginners.
Marble Queen is stunning with white variegation but slower and needs bright light to maintain color. Reverts to solid green in low light.
Neon is solid lime green, tolerates moderate light well, and is striking without variegation requirements.
Jade is solid dark green, fastest-growing, and most forgiving of low light. Best for dim spaces.
Pet safety: All varieties contain calcium oxalates, which cause oral irritation and mild GI upset if chewed or eaten. The ASPCA lists Pothos as toxic, so keep it out of reach of curious pets and small children.
Seasonal Adjustments That Actually Matter
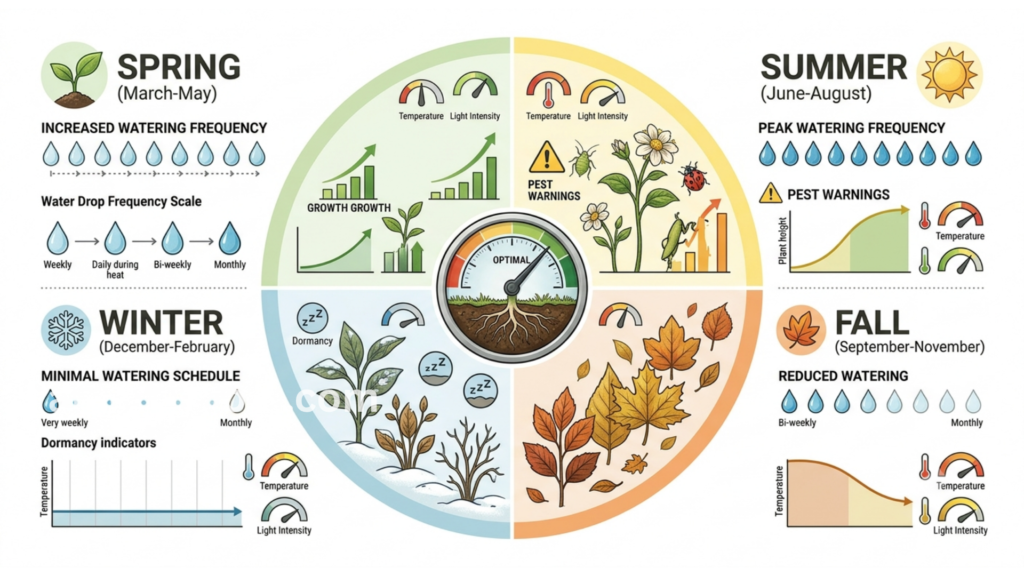
Spring: Growth season begins. Increase watering gradually as you notice new stems unfurling. Start fertilizing monthly around mid-April. This is the best time to repot or take propagation cuttings—rooting success is highest when the plant is actively pushing growth.
Summer: Peak growth and peak pest season. Watering frequency jumps to 1-2 times weekly depending on your humidity and light. Watch south-facing windows for leaf scorch (brown, papery patches). Check plants weekly for spider mites and thrips—they explode in warm, dry indoor air. This is when you’ll catch problems early.
Fall: Growth visibly slows around September. Start reducing watering frequency gradually. Stop fertilizing entirely by October—the plant isn’t building new tissue, so extra nutrients just salt up the soil.
Winter: Minimal growth, which means minimal watering. Water only when the top inch is dry. Don’t fertilize. Indoor heating creates dry air, which paradoxically makes soil dry faster even though it’s cold. Move plants closer to windows since light is at its lowest. Watch for edema (blistered leaves) if you accidentally overwater during dormancy.
The Real Difference
Pothos responds to observation, not schedules. The plants that struggle have owners following generic advice instead of watching what their specific plant actually needs.
Start here: Move your Pothos to the brightest indirect spot available. Wait one week. You’ll probably see growth you didn’t expect.
Next time something looks off, a yellow leaf, slower growth, you’ll know it’s not mysterious. It’s information. Use it.
That’s the entire skill.
Also Read
How to Repot a Plant: Stop Killing Them Now
Chlorophytum Spider Plant Care: The Complete Growing Guide
How Do You Replant an Orchid Without Damaging the Roots?
How Do You Care for a Spider Plant Indoors?

Content writer and SEO specialist with 3+ years of experience in research-driven digital content. At Amelia Roots, he turns carefully researched indoor gardening information into clear, practical guidance for houseplant owners and home gardeners. His work combines content research, search intent, and reader-focused writing with the site's editorial and subject-matter review process.