
If you have a plant right now that you’re nervous about repotting, this is for you.
Maybe its roots are circling the pot. Maybe you’ve been watering it twice as often as before. Or maybe you just have that feeling that it’s outgrown its home—and you’re terrified repotting will kill it.
Here’s what I’ve learned after repotting over 100 plants: repotting itself doesn’t kill plants. The three mistakes we make after repotting do. And all three are completely preventable.
The One Thing Nobody Tells You
Most guides say “repot in spring” and show you how to move a plant into a pot. What they don’t explain: why your healthy monstera develops yellow leaves two weeks later, or why identical steps kill a calathea but save a pothos.
The problem isn’t technique. It’s understanding.
Plant parents panic during repotting and make three specific mistakes. We use pots that are way too big, thinking more space means recovery. We overwater right after, thinking moisture helps. We grab whatever soil is handy, never questioning drainage.
These aren’t beginner mistakes. They’re fear-based mistakes. And they’re fixable once you understand what’s actually happening inside the pot.
Repot vs. Pot Up: The Difference That Changes Everything
This is the distinction almost nobody mentions, and it costs people their plants.
Repotting and potting up are not the same thing.
I learned this the hard way. I repotted a calathea using the aggressive root-loosening technique that works perfectly on pothos. Within 10 days, the leaves turned translucent—the telltale sign of root trauma. It took three weeks to recover.
The problem? I was using a pothos strategy on a calathea. Different plants need different approaches.
Repotting (Same Pot, Fresh Soil)
Your plant isn’t outgrowing the pot. The soil is just depleted.
When: Soil has compacted, nutrients are gone, or it’s been 18+ months since the last refresh.
What you do: Remove plant, gently loosen outer roots, swap 30-50% of old soil for fresh mix, return to the same pot.
Recovery: 2-4 days. The plant stabilizes quickly because the root system isn’t expanding.
Best for: Slow growers, succulents, plants you want to keep at current size.
Potting Up (Larger Pot, Growth Intended)
Your plant has outgrown its home. Roots are circling the pot. Growth has stalled despite good care.
When: Roots visible at drainage holes, watering frequency doubled, or plant growth plateaued.
What you do: Move to a pot that’s 1-2″ larger in diameter. Loosen roots gently. Water thoroughly once. Let it settle for 2-3 days before resuming normal watering.
Recovery: 2-3 weeks. More significant change because roots are expanding into new soil.
Best for: Fast growers like pothos, monstera, philodendron.
The moment I treated these as separate processes—different pot sizes, different post-repot watering, different soil mixes—my success rate doubled. Recovery time dropped by half. Post-repot yellowing basically disappeared.
The Three Mistakes That Actually Kill Plants
Mistake #1: Pots That Are Way Too Big
The scenario: Your plant is root-bound, so you move it into something “comfortably spacious”—jumping from 6 inches to 9 inches.
Within 2-3 weeks: yellow leaves, drooping, root rot.
Why this happens: Fresh potting soil holds moisture. When you have way more soil than the plant’s roots can use, that excess stays wet for days. The roots can’t process the water fast enough. Oxygen depletes. Rot begins.
Think of it like this: a sponge in a small sink uses all the water. Put the same sponge in a large sink and it sits in water for hours. Same principle.
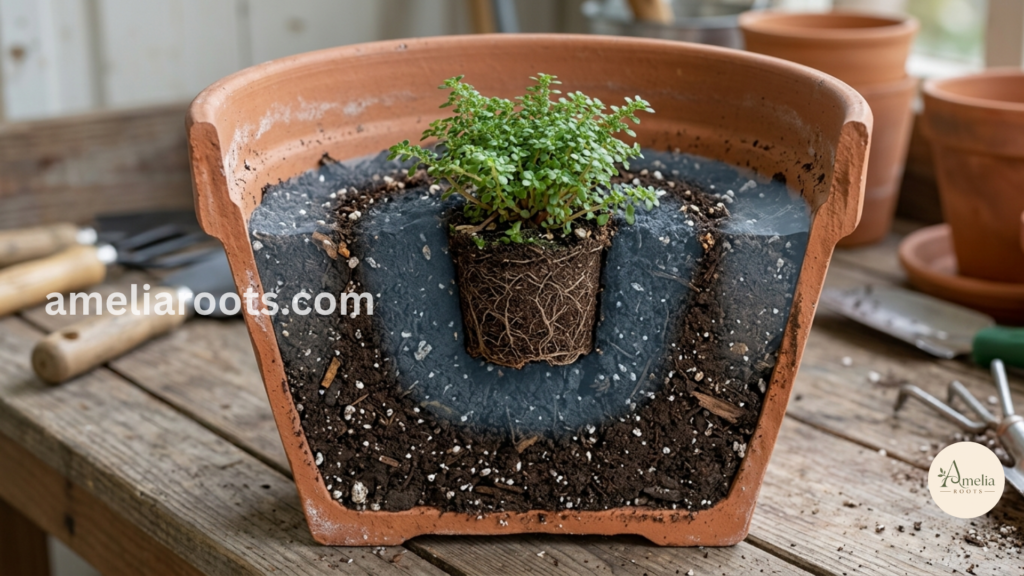
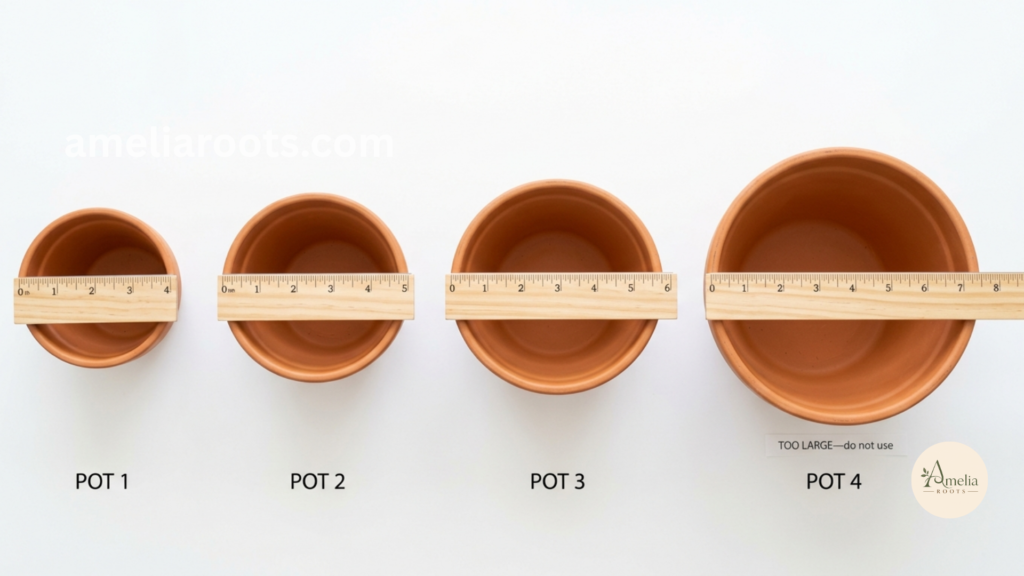
The fix: Use the 1-2 inch rule. That’s it.
- Small pots (4-6″): upgrade by exactly 1″
- Medium pots (6-8″): upgrade by 1-2″
- Large pots (10″+): upgrade by 2″ maximum
When you place the root ball in the new pot, there should be a 1-2 inch gap on all sides to backfill. Nothing more.
I adopted this rule years ago and post-repot yellow leaves disappeared entirely.
Mistake #2: Using Wrong Soil
Generic potting soil from big-box stores often contains water-retention crystals designed for outdoor containers. Indoors, in an enclosed pot, this spells root rot.
I repotted five calathea propagations with cheap soil, thinking I was being efficient. Four developed root rot within two weeks. The fifth—repotted with orchid bark blend—thrived.
The entire difference was soil structure.
Match soil to your plant:
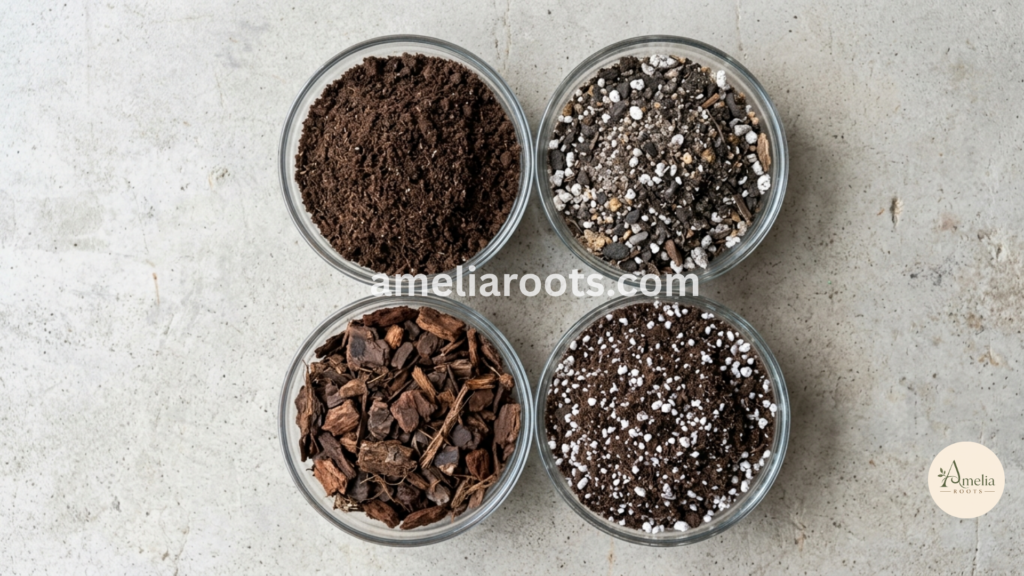
General houseplants (pothos, philodendron, monstera): Standard potting mix + 10-20% perlite
Succulents and cactus: Cactus mix or DIY 1:1:1 (peat : perlite : sand)
Calathea, prayer plants, orchids: Orchid bark blend (60% bark : 40% potting mix)—this is non-optional for these plants
Snake plants, ZZ plants: Standard mix is fine; they prefer denser soil
Test any soil: pour water through it. Drainage should complete in 3-5 seconds. If water pools, add more perlite.
Mistake #3: Overwatering After Repotting
This is the one that breaks my heart because it’s the most preventable.
You’ve just repotted. The plant went through stress. So you water it thoroughly, thinking you’re helping recovery.
Two weeks later: root rot.
Freshly repotted roots are in recovery mode. They can’t efficiently process water. Overwater and you create the exact conditions for anaerobic bacteria to colonize.
Post-repot watering depends on your plant:
Hardy plants (pothos, monstera): Water once right after to settle soil, then wait. Let top 1-2″ dry between waterings for 2 weeks. After that, resume normal schedule.
Sensitive plants (calathea, maranta): Don’t water immediately. Wait 3-5 days. When you do, use bottom watering—place pot on a saucer of water for 15-20 minutes.
Succulents: Don’t water for 5-7 days. These plants store water; fresh soil is moisture enough.
Bottom watering is the advanced move: roots absorb only what they need, reducing shock significantly.
When Your Plant Actually Needs Repotting
Forget “repot in spring.” Watch for these five actual signals:
Roots visible at drainage holes: They’re circling and looking for room. Pot up within 2 weeks.
Watering frequency doubled: You used to water every 7 days, now it’s every 3 days. The pot’s too small.
Growth stopped: Despite good light and care, zero new leaves. Roots have filled available space and growth is constrained.
Roots on soil surface: They’re migrating upward looking for space. Pot up within 4-6 weeks.
Soil dries incredibly fast: Looks like underwatering, but it’s actually root-bound soil draining without absorption. Pot up within 2 weeks.
Not all plants want bigger pots. Succulents, snake plants, ZZ plants, and orchids prefer being slightly root-bound. For these, repot into the same pot with fresh soil instead—every 18-24 months.
What You’ll Need (Before You Start)
Gather these before beginning:
- Pot that’s 1-2″ larger in diameter (must have drainage holes)
- Potting soil appropriate for your plant type
- Small shovel or spoon
- Watering can
- Optional: clean scissors (for root rot), hydrogen peroxide (for sterilizing), newspaper (to contain mess)
Test drainage on your soil by pouring water through a handful. It should drain in 3-5 seconds. If not, add perlite.
The 6-Step Repotting Process
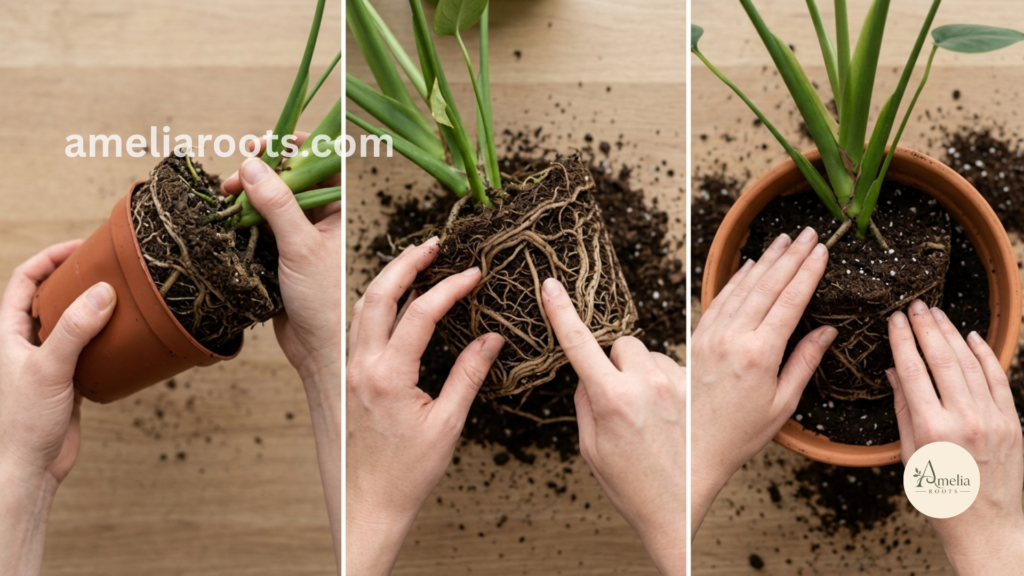
Step 1: Prepare Your Plant (Timing Matters)
Hardy plants (pothos, monstera): Water 2-3 hours before. Hydrated roots recover faster and are easier to handle.
Sensitive plants (calathea, orchids): Repot when soil is almost dry. Drier roots handle disturbance slightly better.
Succulents: Repot when completely dry.
Step 2: Remove From Old Pot
- Plastic pots: Squeeze sides gently, tip on side, slide plant out
- Terracotta: Run a knife around inside edge, gently tip and slide
- Stuck pot: Run under lukewarm water for 30 seconds, try again. If still stuck, breaking a plastic pot is fine.
Don’t force it. Wait 30 seconds and try again if resistance is high.
Step 3: Inspect the Roots
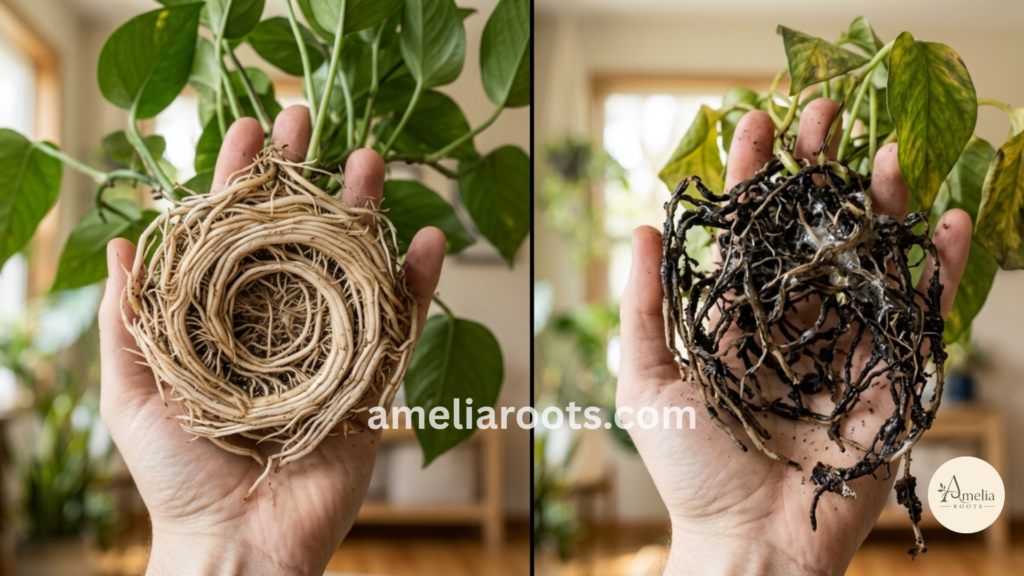
Healthy roots are white to light tan and firm. Root rot is black, mushy, foul-smelling. Root-bound roots spiral in the pot’s shape.
This inspection determines how much you should disturb the roots next.
Step 4: Handle Roots (Species-Dependent)
Hardy roots (pothos, monstera): These benefit from loosening. Make 3-4 gentle vertical “slices” into the outer roots with your fingernail. You’re separating matted roots so new growth can expand outward. Takes 30-60 seconds.
Sensitive roots (calathea, orchids): Zero disturbance. Place plant from old pot into new pot as-is. Don’t tease, don’t remove old soil. Just backfill around it.
Severe root rot: Trim all mushy sections with clean scissors. Brush away old soil gently. If 30%+ of roots are rotten, downsize the pot by 1″ instead of upsizing.
Step 5: Position and Backfill
Add 1-2″ fresh soil to pot bottom. Position plant so soil line matches original soil line—never bury the stem deeper. Fill around root ball with soil. Press gently (not firmly) to settle without compacting.
Leave 1″ space at top for watering room.
Step 6: Water Appropriately
Hardy plants: Water thoroughly to settle soil and hydrate roots.
Sensitive plants: Light watering or skip it entirely. Wait 3-5 days before watering.
Succulents: Don’t water. Wait 5-7 days.
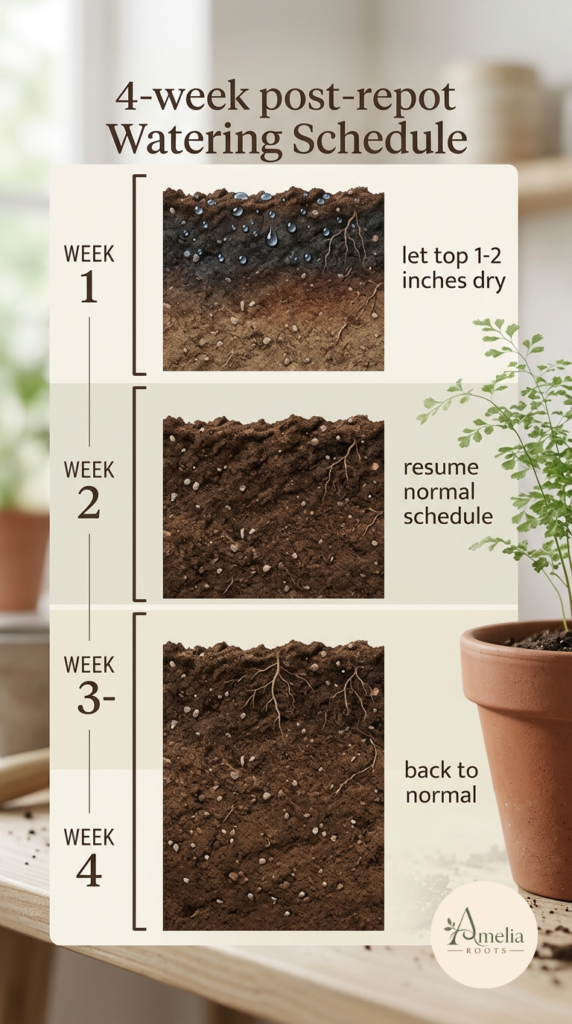
The Critical 2-Week Window
Post-repot is when most failures happen.
Week 1: Let top 1-2″ of soil dry between waterings. Check daily by touch.
Week 2: Resume your normal watering schedule.
Week 3: Back to baseline.
Keep plant in medium indirect light (not intense direct sun). Don’t fertilize for 4-6 weeks—fresh soil has nutrients, and stressed roots can’t process fertilizer efficiently.
Success looks like: new growth appearing, plant looks turgid, no yellowing.
Failure looks like: yellow leaves (overwatering), wilting with wet soil (root rot), mushy stems (active rot).
Species-Specific Guidance (The Details That Matter)
Pothos & Philodendrons
Frequency: 12-18 months | Pot upgrade: 1-2″ | Root handling: Can tease aggressively
These are nearly impossible to kill via repotting.
Monstera & Large-Leaf Philodendrons
Frequency: 18-24 months | Pot upgrade: 1-2″ | Root handling: Tease gently
For tall plants (5+ feet): Lay on its side on rolled towels during pot removal to prevent stem stress. Return to upright once repotted.
Calathea, Prayer Plants, Maranta
Frequency: 12-15 months (spring only) | Pot upgrade: 1″ maximum | Soil: Orchid bark blend mandatory
Minimal disturbance approach is non-negotiable. Leaves may curl for 2-7 days post-repot (normal stress response). Expect 2-3 weeks recovery.
Succulents, Aloe, ZZ Plants
Frequency: Repot same pot yearly; pot up every 2-3 years | Pot upgrade: 1″ maximum | Soil: Cactus mix mandatory
Wait 5-7 days before first watering. These plants store water; they can wait.
Snake Plants / Sansevieria
Frequency: Repot same pot every 2 years; pot up every 3+ years | Pot upgrade: 0.5-1″ | Root handling: Minimal disturbance
These are nearly unkillable. I’ve repotted them incorrectly and they survived.
Orchids
Frequency: Every 2-3 years (when bark breaks down) | Medium: Orchid bark or sphagnum moss only | Root handling: Zero disturbance
Orchid roots are air-roots that evolved to be exposed between waterings. Don’t tease them.
The Tool That Makes Execution Automatic
Now you have the knowledge. The next step is actually doing it.
One thing I’ve found that separates people who know this information from people who use it: having a reference checklist.
A checklist prevents panic moments. It keeps you from reverting to old habits mid-repotting.
Before you repot, work through this:
- Have I identified this plant’s specific needs in Section 6?
- Am I doing a “repot” (same pot) or “pot up” (larger pot)?
- Is new pot exactly 1-2″ larger?
- Does it have drainage holes?
- Have I tested soil drainage (3-5 second drain test)?
- Is plant watered appropriately for its species?
This 60-second checklist will improve your success rate more than almost anything else.
When Things Go Wrong (Troubleshooting)
Plant looks droopy: Normal transplant shock for 3-7 days. Monitor: if drooping stops with proper watering, it’s recovering. If drooping + wet soil, you have overwatering.
Yellowing leaves: Stop watering immediately. Let top 2″ dry completely before resuming. This is 99% overwatering.
Mushy roots or sulfur smell: Emergency mode. Trim all mushy roots. Repot into smaller pot with cactus mix. Water very lightly. This is catchable if you act within 2 weeks.
The Actual Difference You’ll See
When you repot correctly:
- New growth appears within 3-4 weeks
- Watering normalizes (no more constant thirst signals)
- Root rot risk drops to near-zero
- Plant lifespan extends by years
When you get it wrong, the plant survives but is stressed for weeks. Growth stalls. You’re constantly fighting problems.
The difference isn’t luck. It’s the 1-2 inch pot rule, the right soil type, and species-appropriate post-repot watering.
Master those three things and your success rate approaches 95%.
Your Next Step (Today)
- Identify your plant species above
- Read that specific guidance
- Gather supplies
- Work through the 6-step process—don’t rush it
- Use the checklist before you start
By week 4, you’ll know if you nailed it. New growth visible = success. If you see failure signs, adjust your watering or pot size next repotting.
That’s it.
The rest is just patience while the plant recovers.
Also Read
How Do You Replant an Orchid Without Damaging the Roots?
How Do You Care for a Spider Plant Indoors?

Content writer and SEO specialist with 3+ years of experience in research-driven digital content. At Amelia Roots, he turns carefully researched indoor gardening information into clear, practical guidance for houseplant owners and home gardeners. His work combines content research, search intent, and reader-focused writing with the site's editorial and subject-matter review process.